Pages Menu
Categories Menu

Posted by on Apr 19, 2012 in Code, Mobile, The Cloud |

Storing Data Offline with Salesforce Mobile SDK SmartStore

Storing Data Offline with Salesforce Mobile SDK SmartStore

Say you’re writing a “hybrid” mobile app for iOS and Android using PhoneGap (“Callback” or “Cordova”) and you want to store data locally. Your choices are kind of limited. You could, for instance, use WebSQL, which has been implemented in WebKit for a while now and is available on both iOS and Android devices. If you clicked that link, though, you’ll probably notice the big scary warning that WebSQL has been deprecated…


It works right now, but maybe it’s not the best idea to use it if you don’t want to have to strip it out someday down the road. You also have to deal with all the data size limitations and requests to the user to allow the app to increase the database size.

So, what’s up next from the W3C if the WebSQL spec isn’t being maintained? The new spec is IndexedDB, which is a “database of records holding simple values and hierarchical objects”. Perfect! We’ll just check caniuse.com to make sure it’s supported on iOS and Android:


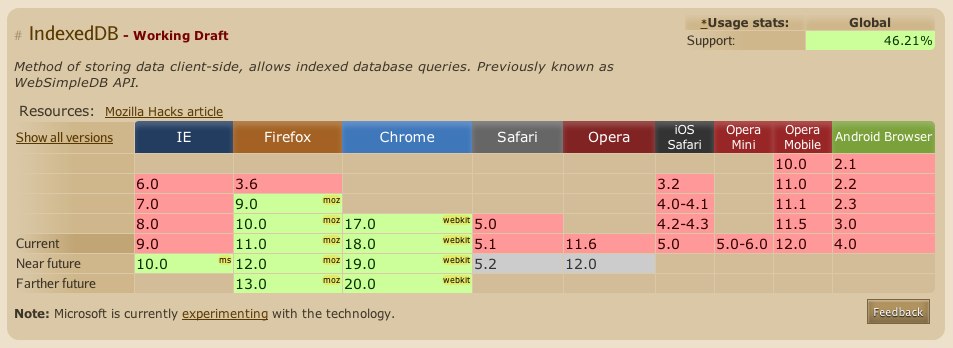
So… okay. It looks like it’s not supported yet on either. Does PhoneGap provide anything? In fact, it does, the Storage class. Which is based on WebSQL… I think you can see where I’m going here.

What do you do? Well, the Salesforce Mobile SDK for iOS and Android has implemented an ORM layer called SmartStore abstraction to SQLite, which uses FMDB on iOS and SQLCipher on Android. It’s easy to use and allows you to store data in JSON format locally and specify indexes for searching and sorting. Also, it uses native implementations of SQLite which are accessed via PhoneGap plugins so you don’t have any issues with HTML5 storage limitations or the W3C changing their mind about what web database technology everyone should standardize on.

To demonstrate SmartStore, I’ve put together a simple demo app, and posted it to Github:

https://github.com/tomgersic/SmartStoreDemo

The Sample App

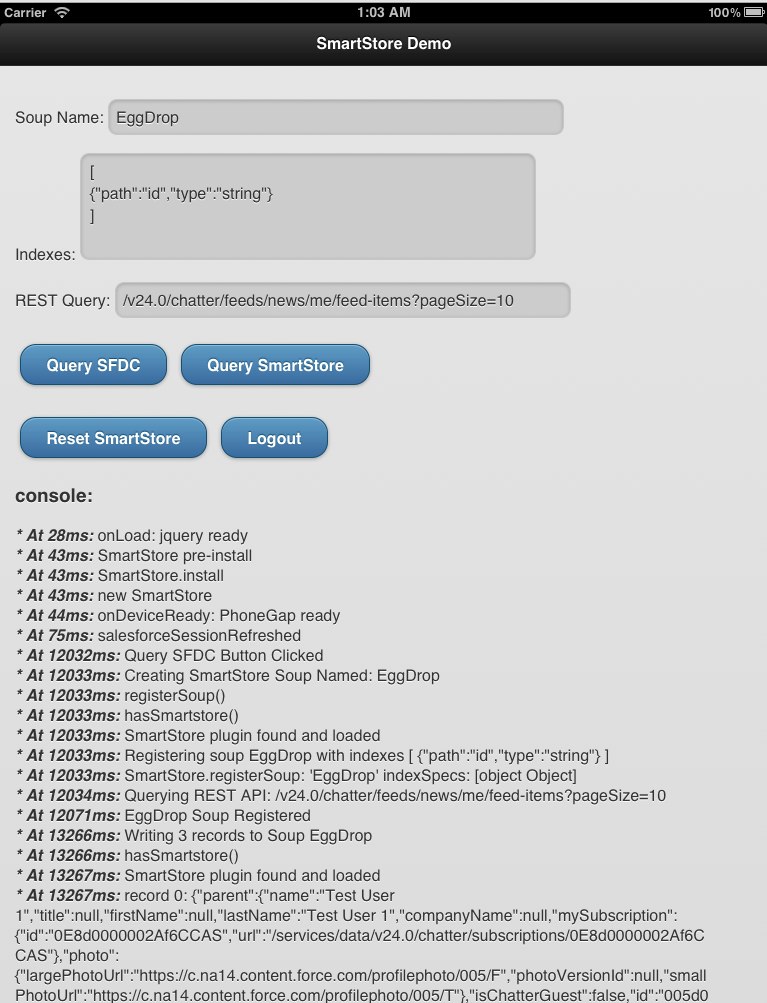
Here it is running on the iPad simulator. One thing to know about SmartStore is that each database Table is called a Soup. It’s an Apple Newton thing. The Newton’s file system was based on a “Soup” store model. So here, I’ve asked the app to create a new Soup named “EggDrop” specified that I want to use just the “id” field as an index, and entered a Salesforce REST API query to be executed using the handy ForceTK library.


To start off, download the code from GitHub and open up the XCode project. If you want to start from scratch, you’ll want to install the Salesforce Mobile SDK for iOS and selected “Hybrid Force.com App” from X-Code’s New Project wizard.


Going from top to bottom:

  • Input Boxes
  • Soup Name: A “Soup” named this will be created.
  • Indexes: I’ll show how this gets represented in the data model in a bit, but you can specify JSON fields for indexing and specify a type of either “string” or “integer”.
  • REST Query: Basically any query to the Salesforce REST API. Here we’re just defaulting to pulling down my Chatter feed items. I have 3 in my feed in a dev org that we’ll pull down.
  • Buttons
  • Query SFDC: Run the REST Query, save the results to the specified Soup, and log the results to the console (on the page).
  • Query SmartStore: Query the specified Soup and log the results to the console. They should be the same results as the remote Salesforce Query.
  • Reset: Delete all the Soups that we’ve created during this session.
  • Logout: Log out of your Salesforce org.


SmartStore Soup Functions

To see how all this works, the interesting bits are in the inline.js file.

  • To register a Soup, we call registerSoup:


navigator.smartstore.registerSoup(soupName,indexes,success,error);

  • To add some records to that Soup, we call upsertSoupEntries:


navigator.smartstore.upsertSoupEntries(soupName,records, success, error);

  • To query the Soup, first we have to define a querySpec (buildAllQuerySpec just pulls all records rather than searching for specific records):


var querySpec = navigator.smartstore.buildAllQuerySpec(“id”, null, 20);


This querySpec specifies “id’ as an index, null (allow default) for the sort order, and 20 for the page size.

  • We then use that querySpec to get records back from the Soup:


navigator.smartstore.querySoup(soupName,querySpec, success(cursor),logError);

  • Additionally, if we want, we can delete Soups with removeSoup:


navigator.smartstore.removeSoup(record,success,error);

Running the App

When you run the app for the first time, you’ll be presented with an oAuth 2.0 User-Agent login screen for Salesforce. If you don’t already have a Developer Org, get one at http://developer.force.com/. It’s free.

Once you log in, hit Query SFDC, and you see the Soup get registered, JSON data gets downloaded from the REST API and added to the SOUP. Take a look at the JSON data, and then hit the “Query SmartStore” button. You’ll see it load that same data from the SmartStore Soup and display it in the console log.

The Database

Let’s take a look at the actual SQLite database file and see how things are stored behind the scenes. You’ll see we have 3 tables in the database: soup_names, soup_index_map, and TABLE_1 (sqlite_master and sqlite_sequence are used internally by SQLite):


  • soup_names keeps a list of the Soups I’ve created


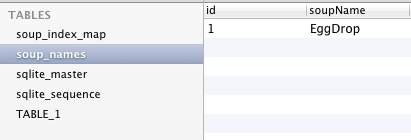
  • soup_index_map keeps track of the indexes for each Soup.


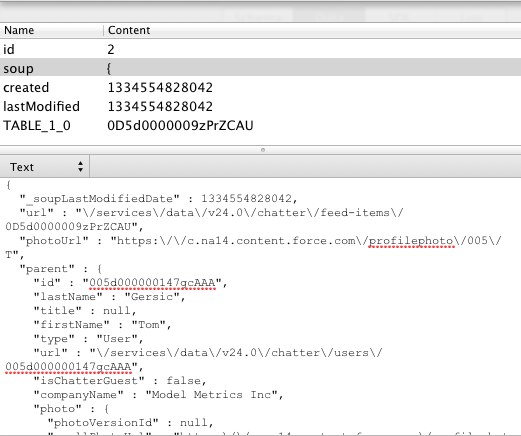
  • TABLE_1 is a generically named table that contains my JSON data and Index values. The TABLE_1_0 field here is the “id” index we specified when we created the Soup. If I had created more indexes, like a “name” index, another column would be shown here.


The Soup field contains the full JSON response for that record so you can reuse whatever code you wrote to deal with the JSON record from the REST API once you’ve pulled it from the Soup.


So that’s SmartStore. It’s a great way to put together an app for Salesforce, Database.com, or Chatter that stores JSON data on the device for offline access.

Facebooktwitterredditpinterestlinkedinmail Read More

Posted by on Nov 19, 2011 in Code, Mobile, The Cloud |

Using XMLHttpRequest2 in iOS 5 or Android OS 3 to download binary files using HTML5/Phonegap

One of the things added to Safari and UIWebView in iOS5 is support for XMLHttpRequest 2, which according to W3C adds new features “such as cross-origin requests, progress events, and the handling of byte streams for both sending and receiving”. As part of the last bit of that, it’s now possible to set the responseType to arraybuffer, which is “used to represent a generic, fixed-length binary data buffer”. More info here. This is useful if you want to download binary such as image or audio data from a remote location, and potentially manipulate it before presenting it to the user.

This has many possible applications for file transfer, but for instance, if you’re writing an HTML5 / PhoneGap app for iOS 5, and you want to download an attached file from the current version (v23.0) of the Chatter REST API, you need to send a GET request to:

https://test.salesforce.com/services/data/v23.0/chatter/files/[PUT THE FILE ID HERE]/content?versionNumber=1

But, you have to include a few headers for authentication…

setRequestHeader(“Authorization”, “OAuth ” + oauthToken);

setRequestHeader(‘X-User-Agent’, ‘salesforce-toolkit-rest-javascript/v23.0’);

…so it’s not like you can just dump the GET request into the src of an <img> tag. So, what you can do now in iOS 5 is send off an XMLHttpRequest with a responseType of “arraybuffer”, and use this data to write to a HTML5 Canvas object.

Here’s the XMLHttpRequest:

    var request = new XMLHttpRequest();     
    request.open(“GET”, url, true);
    request.responseType = “arraybuffer”;
    request.setRequestHeader(that.authzHeader, “OAuth ” + that.sessionId);
    request.setRequestHeader(‘X-User-Agent’, ‘salesforce-toolkit-rest-javascript/’ + that.apiVersion);
    request.onreadystatechange = function() {
        // continue if the process is completed
        if (request.readyState == 4) {
            // continue only if HTTP status is “OK”
            if (request.status == 200) {
                try {
                    // retrieve the response
                    callback(request.response);
                }
                catch(e) {
                    // display error message
                    alert(“Error reading the response: ” + e.toString());
                }
            }
        }            
    }
    request.send();

And here’s the body of the callback that handles Base64 encoding the arraybuffer and writing that data to a Canvas using the Data URI Scheme:

function(response){
    var imageCanvas = $('#'+value.id);
    var cxt = imageCanvas[0].getContext("2d");

    var myImage = new Image();

    myImage.src = "data:"+value.mimeType+";base64,"+base64ArrayBuffer(response);

    imageCanvas[0].width=myImage.width;
    imageCanvas[0].height=myImage.height;

    cxt.drawImage(myImage,0,0,myImage.width,myImage.height);
}

For the Base64 encoding, I used this handy function that I found over on PasteBin.
Note, I haven’t tested it, but this should (probably) work on Android OS 3.0 (Honeycomb) as well.
If you’re interested in doing all this with ForceTK, take a look at this Pull Request over on GitHub.
Facebooktwitterredditpinterestlinkedinmail Read More

Posted by on Sep 13, 2011 in Code, Mobile, The Cloud, Videos |

Application Development with Android

http://www.youtube.com/watch?v=ZTNRO24-s7g

This is a link to my Dreamforce 2011 session on Application Development with Android. Mobile application development sure is a hot topic these days, and the Android platform is gaining fast, especially with new tablet formats. Every mobile app needs a robust, secure, and capable database. So this coding session will walk you through creating an application on the Android platform by leveraging the power of Database.com. We’ll give you all the details you need to begin participating in the hottest segment of cloud development.

Facebooktwitterredditpinterestlinkedinmail Read More

Posted by on Feb 25, 2011 in Code, The Cloud |

Cloud to Cloud: Using AWS Simple Email Service from Force.com

Amazon released a really interesting service not too long ago called Simple Email Service (SES). It allows you to send individual or bulk emails without having to rely on your own mail servers. This is important because sending (legitimate) mass emails while staying off spam blacklists like Spamhaus is no simple task, and you don’t want all of your company emails to start being blocked by ISPs that subscribe to those blacklists. If you have all of your customer data in Salesforce.com, you’ll be able to email some of them with Salesforce’s standard email capabilities, but they have pretty strict governor limits (1,000 emails per SFDC License) when it comes to sending external emails, so mass emailing is often not a possibility without a third-party provider.

Reasons why you may want to consider using SES

  1. Ever receive an email from Amazon.com? Yeah, so has everybody else. They know a thing or two about sending out mass emails.
  2. Their pricing is ridiculously competitive. Other mass email services start out around $15 per thousand emails. Amazon charges $0.10 per thousand. Of course, other services offer more in the way of campaign management, point-and-click setup, and analytics, but if you’re just sending emails, it’s hard to beat the price.
  3. It’s relatively easy to use. Emails are sent through simple RESTful API calls.


Getting set up

So assuming you’re already an AWS member, first off you have to sign up for SES. That will get you set up with a developer account relatively quickly, and you can test sending emails to a few email addresses with the ses-send-email.pl script that comes with the AWS SES Developer Tools. If you want to actually start sending out mass emails, you have to then request production access from Amazon.

Sending emails from Force.com

First off, get the Apex code here.

Then, take a look through the files:

AWS.cls

This is a top-level abstract class that has a few methods in it that you’ll need for any AWS functions. This includes the code to generate a signature from the current Date/Time and your AWS Secret Key:

public string signature(String awsNow, String secret) {

     system.assert( secret != null ,‘ missing S3.secret key’);

     Blob bsig = Crypto.generateMac(‘HmacSHA256’, Blob.valueOf(awsNow), Blob.valueOf(secret));          

     return EncodingUtil.base64Encode(bsig); 

And the code to generate the authorization header using that signature:


public string headerForAmazonAuthorization(String accessKey, String signature)

{

return ‘AWS3-HTTPS AWSAccessKeyId=’+accessKey+’, Algorithm=HmacSHA256, Signature=’+signature;

}

SES.cls

Being an abstract class, AWS.cls is then subclassed by SES.cls. This includes the method to actually send an email by setting the HTTP headers and body, and sending the request to the SES endpoint. To use this, you just need to send in a List of recipient addresses, your from: address, a subject, and a body for the email. The response from AWS is then written to the debug log, so you can see any error messages sent back by Amazon.

SESEmail.cls

The SESEmail class defines a single SES Email message with multiple recipients, a sender, a subject, and a body, and it takes care of URL Encoding all of that and setting up the Body of the request to Amazon.

AWSKeys.cls 

So this one I didn’t actually write. I got it from the Force.com AWS Toolkit. Mostly it just reads your AWS Access Key and Secret Key from a custom object. The authentication code in that toolkit is a bit out of date for the current version of the AWS API, and I did modify this class to be a singleton so a DML statement doesn’t get kicked off every time you query for your AWS Keys. If you’re using this, you’ll probably also want to make the AWSKey__c SObject private so your entire org doesn’t have access to your AWS keys, but I’ll leave that as an exercise for the reader.

SESController.cls

Last, and I’ll be honest, least, is a dummy VF Page and controller that connects the dots and sends off emails using SES. The page is a pretty simple page that calls the controller:

<apex:page controller=”SESController” action=”{!constructor}” >

And sends an email to a List of recipients:


AWSKeys awsKey = AWSKeys.getInstance(AWSCredentialName);

SES sesEmail = new SES(awsKey.key,awsKey.secret);


List<String> recipients = new List<String>();

recipients.add(‘nobody@modelmetrics.com’); 

String sender = ‘nobody@modelmetrics.com’;

String subject = ‘Test message’;

String body = ‘This is the body of the message’;


sesEmail.sendEmail(recipients,sender,subject,body);


That’s it. Relatively easy. Adding test classes is left as an exercise for the reader ;-).

Facebooktwitterredditpinterestlinkedinmail Read More

Posted by on Apr 26, 2010 in Code |

Importing a Flex 3 AIR project into Flash Builder 4

I had some issues over the weekend trying to import an Flex Builder 3 AIR project into Flash Builder 4. This post gives a good description of how it is supposed to work, and I assume that it does work for Flex web projects, but it didn’t work for me with an AIR project. Every time I imported the AIR project, Flash Builder 4 interpreted it as a Flex Web project, so of course it didn’t actually build. I was migrating from an OSX Flex Builder 3 to a Windows Flash Builder 4, so that may also have been an issue, I’m not sure.

Anyway, the way I finally got it working was to create a new AIR Desktop project in Flash Builder 4 and copy the entire src folder over from the Flex Builder 3 project. The only thing that you can’t copy is the app.xml file, as it seems to be in a slightly different format in FB4, and the project won’t build.

SVN

This causes some problems if you want to continue a development effort using SVN, and other members of your team are using Flex Builder 3, because the actual project can’t be shared between the two versions of the IDE. However, the src folder can be shared without issue, so if you check just that folder out into your new Flash Builder 4 Project shell, and over-write the app.xml file you’ll be good to go, just don’t accidentally commit the app.xml file to the repository, or you’ll break the build for everybody else.

Facebooktwitterredditpinterestlinkedinmail Read More

Posted by on Nov 19, 2009 in Code |

OSX Firefox Flex/Flash redraw bug workaround

There’s a known redraw bug in the OSX version of the Firefox Flash Player plugin that’s pretty irritating. If you do something that causes too many redraw events to get called in quick succession, Flash will fail to redraw the screen properly, and you end up with a mish-mash of phantom objects on the screen:

This happens most commonly with older versions of SWFAddress, but can also happen if you have a canvas with a scrollbar on it, and you scroll up and down rapidly. If the .swf fills the window, the user can fix this issue by resizing the browser window, thus causing the entire .swf to redraw. However, this is clearly not a workable solution. The most obvious way to fix this problem would seem to be to call invalidateProperties() and/or validateNow() on the parent Canvas, but this doesn’t actually work. The Flash Player seems to think it has already been redrawn, and doesn’t do it again.

A quick workaround? Make the parent canvas invisible and then visible again. This causes it to be redrawn. For instance, if you have a canvas with a scroll bar that is causing the problem, you can add an event handler to the Canvas’ scroll event, and cycle the visibility off and on. It’s imperceptible to the user, and fixes the issue.

<mx:Canvas scroll=”handleScrollEvent(event)”/>

private function handleScrollEvent(event:ScrollEvent):void
{
this.visible = false;
this.visible = true;
}

Facebooktwitterredditpinterestlinkedinmail Read More