Pages Menu
Categories Menu

Posted by on Sep 13, 2011 in Code, Mobile, The Cloud, Videos |

Application Development with Android

This is a link to my Dreamforce 2011 session on Application Development with Android. Mobile application development sure is a hot topic these days, and the Android platform is gaining fast, especially with new tablet formats. Every mobile app needs a robust, secure, and capable database. So this coding session will walk you through creating an application on the Android platform by leveraging the power of Database.com. We’ll give you all the details you need to begin participating in the hottest segment of cloud development.

facebooktwittergoogle_plusredditpinterestlinkedinmail Read More

Posted by on Aug 21, 2011 in Mobile, The Cloud |

oAuth 2.0 for Salesforce.com

At this point in time, we’ve implemented the oAuth 2.0 User-Agent flow and the Refresh Token flow for iOS, Android, and Flex/AS3. I figure that makes us as much an expert at doing this as anybody, so I thought I’d take a moment to describe some of the details. First off, the reason you want to use oAuth 2.0 when developing apps for mobile devices… no token. We’ve been developing mobile apps for Salesforce.com for the last 4 or so years, and the need to provide a username, password, and token has always been a pain point. Since it’s a 24 character alpha-numeric string, this was especially problematic back before iPhones had copy/paste functionality (“is that a l, an I or a 1?”). With oAuth 2.0, you can finally get rid of having to worry about the token.

oAuth 2.0 is a popular universal specification for authentication to various web services. If you’ve used a mobile app that logs into Facebook, Twitter, LinkedIn, or Chatter, you’ve probably used it. for Salesforce.com provides four different authentication flows:

  • Web Server
  • User-Agent
  • Refresh Token
  • Username/Password

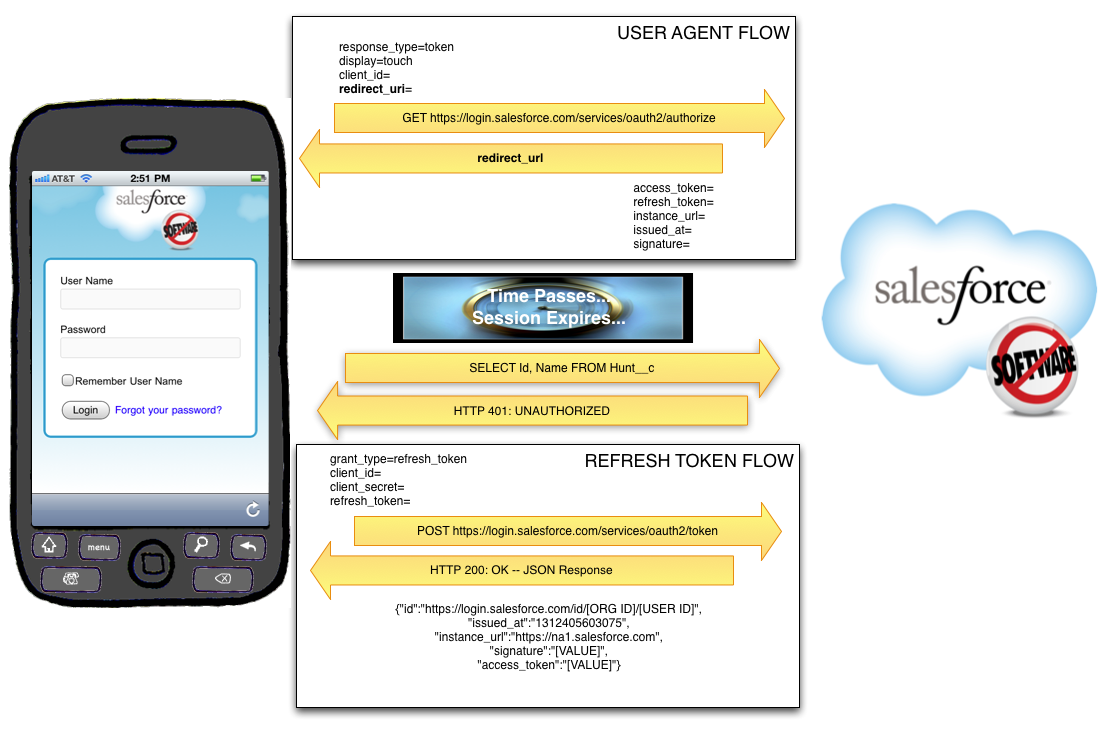
A combination of the User-Agent flow and Refresh Token flow are recommended for mobile applications, so that’s what I’ll demonstrate here.

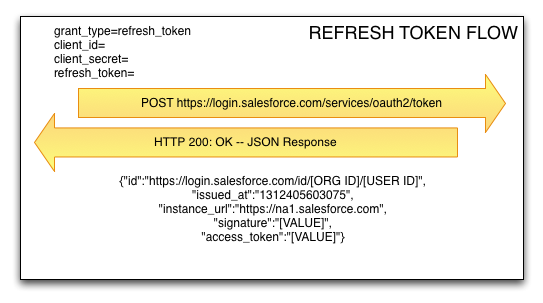
First off, you should understand both flows from a high level:


Salesforce Configuration

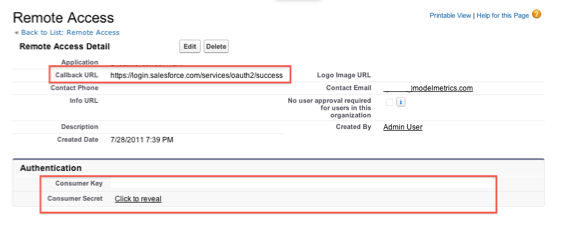
Both the User-Agent flow and the Refresh Token flow require a Remote Access Application be set up in the target SFDC org. This is configured under Setup=>Develop=>Remote Access. Required fields are Application, Contact Email, and Callback URL. There are a variety of rules about what the Callback URL can be, but the simplest way to do this is to have it be: https://login.salesforce.com/services/oauth2/success

Once saved, SFDC will generate and display a Consumer Key and a Consumer Secret. Both of these will be needed by the application for login.

User-Agent Flow

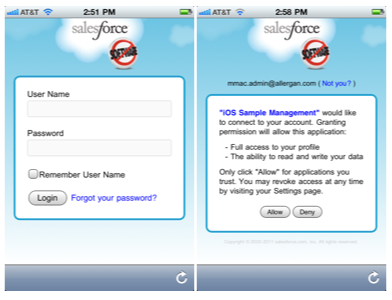
The User-Agent flow involves the use of a webview within the application. The app passes a special Salesforce.com URL to that webview, which renders a login view.

First, the user will be asked to log in, and then they will be asked to confirm that they would like to provide access to Salesforce.com using this application:

The URL passed to SFDC in order to render this login view is in this format:

https://login.salesforce.com/services/oauth2/authorize?

response_type=token&

display=touch&

client_id=[CONSUMER KEY FROM REMOTE ACCESS]&

redirect_uri=https%3A%2F%2Flogin.salesforce.com%2Fservices%2Foauth2%2Fsuccess

Upon successful login, SFDC will redirect the webview to the URL specified as the redirect_uri (which must be the same as the Callback URL specified in the Remote Access Application setup). After the Callback URL will be a hash tag and then a series of parameters returned by Salesforce:

access_token=[ACCESS TOKEN (Session Id)]

&refresh_token=[REFRESH TOKEN]

&instance_url=https%3A%2F%2Fna1.salesforce.com

&id=https%3A%2F%2Flogin.salesforce.com%2Fid%[ORG ID]%[USER ID]

&issued_at=1312403866216

&signature=[SIGNATURE]

The Access Token specified here is the Session ID that will be used for all subsequent calls to the API. The Refresh Token must be saved securely to disk, as it will be used in conjunction with the Consumer Key and Consumer Secret to get a new Access Token from SFDC when the current on expires. The Org Id, User Id, Issued At Time (number of milliseconds since the Unix Epoch), and Signature should be saved as well.

Refresh Token Flow

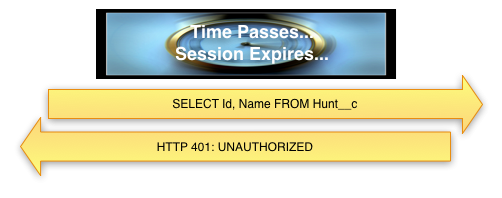
At some point in time, your Access Token will expire. This may come as a shock, so be sure to prepare your friends and family. The app will learn that the session ID has expired when it attempts to access the API and the response is either:

  • SOAP API: HTTP 500 Internal Server Error, with a faultCode: <faultcode>sf:INVALID_SESSION_ID</faultcode>
  • REST API: HTTP 401 Unauthorized

The amount of time a session ID remains valid is configured under Security Controls => Session Settings  in SFDC Setup. When it expires, the app will have to use the Refresh Token flow to request another Access Token from SFDC. To do this, the application will send a POST request to SFDC including the Refresh Token, the Consumer Key, and the Consumer Secret. SFDC will respond with a new Access Token.

NOTE: At no time does the application store the Username or Password of the individual logging into the app.

So, that’s it. I hope you’ve enjoyed this foray into the world of oAuth 2.0 and Salesforce.com.


facebooktwittergoogle_plusredditpinterestlinkedinmail Read More

Posted by on Apr 6, 2011 in Mobile |

iOS Enterprise MDM Configuration Capabilities


Thought I’d put together an easy to reference list of the various things that can be configured by an enterprise Mobile Device Management administrator for iOS:

Password

  • Required
  • No Repeating/Ascending/Descending Characters
  • Require Alphanumeric
  • Minimum Password length
  • Minimum number of non-alphanumeric characters required
  • Maximum password age (1-730 days)
  • Auto-lock (1-5 minutes)
  • Password History (1-50 Passwords)
  • Grace Period for Device Lock (amount of time the device can be locked without prompting for a password on unlock)
  • Maximum number of failed attempts (before all data on device will be erased)

Restrictions

  • Allow installing apps
  • Allow use of camera
    • Allow FaceTime
  • Allow Screen Capture
  • Allow Automatic Sync while Roaming
  • Allow voice dialing
  • Allow In App Purchase
  • Allow Multiplayer Gaming
  • Allow Adding Game Center Friends
  • Force Encrypted Backups
  • Applications
    • Allow use of YouTube
    • Allow use of iTunes Music Store
    • Allow use of Safari
      • Enable autofill
      • Force fraud warning
      • Enable JavaScript
      • Block Pop-ups
      • Accept Cookes: Always, Never, From Visited Sites
      • Allow Explicit Music & Podcasts
    • Allowed Content Ratings
      • Movies: Don’t Allow Movies, G, PG-13, R, NC-17, Allow All Movies
      • TV: Don’t Allow TV Shows, TV-Y, TV-Y7, TV-G, TV-PG, TV-14, TV-MA, Allow All TV Shows
      • Apps: Don’t Allow Apps, 4+, 9+, 12+, 17+, Allow All Apps

Wi-Fi

  • Service Set Identifier (SSID)
  • Hidden Network (if target network is set to not broadcast)
  • Security Type: Any (Personal), None, WEP, WPA/WPA2, WEP Enterprise, WPA/WPA2 Enterprise, Any (Enterprise)
  • Password

VPN

  • Connection Name
  • Connection Type: L2TP, PPTP, IPSec (Cisco), Cisco AnyConnect, Juniper SSL, F5 SSL, Custom SSL
  • Server Hostname or IP Address
  • Account
  • User Authentication: Password, RSA SecurID
  • Shared Secret
  • Send All Traffic (Route all network traffic through VPN)
  • Proxy Setup

Email

  • Account Description
  • Account Type: IMAP, POP
  • User Display Name
  • Email Address
  • Mail Server and Port
  • Authentication Type: None, Password, MD5 Challenge-Response, NTLM, HTTP MD5 Digest
  • Password
  • Use SSL

Exchange ActiveSync

  • Account Name
  • Exchange ActiveSync Host (Exchange Server)
  • Use SSL
  • Domain
  • User
  • Email Address
  • Password
  • Past Days of Mail to Sync: No Limit, 1 Day, 3 Days, 1 Week, 2 Weeks, 1 Month
  • Authentication Credential Name
  • Authentication Credential
  • Include Authentication Credential Passphrase

LDAP

  • Display Name
  • Account Username
  • Account Password
  • Account Hostname
  • Use SSL
  • Search Settings

CalDAV

  • Account Description
  • Account Hostname and Port
  • Principal URL
  • Account Username
  • Account Password
  • Use SSL

CardDAV

  • Account Description
  • Account Hostname and Port
  • Principal URL
  • Account Username
  • Account Password
  • Use SSL

Subscribed Calendar

  • Description
  • URL
  • Username
  • Password
  • Use SSL

Web Clips (web pages saved to the home screen as bookmarks)

  • Label
  • URL
  • Removable (yes/no)
  • Icon
  • Precomposed Icon
  • Full Screen

Credentials

  • Specify PKCS1 and PKCS12 certificates needed to authenticate access to your network

SCEP

  • URL for SCEP server
  • Name
  • Subject (representation of X.500 name)
  • Subject Alternative Name Type (None, RFC 822 Name, DNS Name, Uniform Resource Identifier)
  • Subject Alternative Name Value
  • NT Principal Name
  • Challenge
  • Key Size: 1024, 2048
  • Use as digital signature
  • Use for key encipherment
  • Fingerprint (hex string)

MDM

  • MDM Server URL
  • Check in URL
  • Topic (Push notification topic for management messages)
  • Identity: Add credentials in Credentials payload, SCEP
  • Sign Messages: yes/no
  • Access Rights granted to remote administrators:
    • Query Device for:
      • Device Information
        • unique device identifier (UDID)
        • device name
        • iOS version
        • device model name and hardware version
        • serial number
        • overall and available storage capacity
        • IMEI number
        • the modem firmware version
        • SIM card ICCID
        • and MAC addresses for integrated Wi-Fi and Bluetooth
        • carrier currently being used
        • the carrier specified by the current installed SIM card
        • the version of the carrier settings (APN) data
        • assigned phone number
        • whether or not data roaming is currently allowed
        • list of configuration profiles installed
        • list installed security certificates and expiry dates
        • list of enforced restrictions
        • hardware encryption capability
        • whether an unlock passcode is set
        • installed applications (with App identifier, name, version, and size)
        • a list of any application provisioning profiles with expiration dates.
    • General Settings
    • Security Settings
    • Network Settings
    • Restrictions
    • Configuration Profiles
    • Applications
    • Provisioning Profiles
  • Add / Remove:
    • Configuration Profiles
    • Provisioning Profiles
  • Security
    • Change device password
    • Remote Wipe
  • Apple Push Notification Service
    • Use Development APNS Server

Advanced

  • Access Point Name (APN): The name of the GPRS access point
  • Access Point User Name
  • Access Point Password
  • Proxy Server and Port
facebooktwittergoogle_plusredditpinterestlinkedinmail Read More

Posted by on Feb 9, 2009 in Code, Mobile |

Clang! Powerful Memory Profiling for the iPhone


I’ll start by saying that Clang is a must-have tool for every iPhone developer. It’s easy to use, and it does a fantastic job of profiling the memory usage of your apps.

The iPhone is a powerful hand-held device, but the memory constraints are tight enough that they can cause serious problems with application performance. With 128 MB of memory on board, other applications running in the background, and a virtual memory model that does not include swap space, it’s easy to run out of memory and crash an app. Even though your iPhone has 8GB or 16GB of Flash storage, memory that your application allocates will not be swapped out to the disk to free up system memory. Since over-releasing objects will crash an application in difficult to understand ways, it can be tempting to be cautious about releasing objects. However, the system monitors memory usage, and shuts down any application that takes up too much memory. This is the cause of a great many application crashes on the iPhone. You can use around 30 MB safely for a sustained period of time. Get closer to 40 or 45 MB, and the system will very likely shut your app down with an exit status of 101.

In order to make sure you’re not leaking memory, it’s important to use memory profiling tools to catch leaks and inefficiencies in your code. The iPhone SDK ships with a handful of useful profiling applications in a package called “Insruments”. These programs allow you to watch memory and processor usage while your app is running on your iPhone. Some of the Instruments that are especially useful are Leaks, Object Allocations, and Memory Monitor. These are great tools, but they have some serious limitations. For instance, while Leaks and Object Allocations are fantastic for catching memory leaks, neither one will alert you to a leak of an image object, which seems kind of important. Who cares if you’ve leaked a 48 byte NSString, when you just leaked a 3MB UIImage? Memory Monitor can be useful in this regard, because it lets you monitor total memory usage of all apps running on the device, even the various built-in subsystems like SpringBoard, MobileSafari, and a handful of various daemons. However, it still makes finding an elusive memory leak difficult.

Enter Clang, a static analyzer that is a tremendous asset to any iPhone developer. To use Clang, you build (but not run) your app for the simulator in Debug mode, and then run a Clang analysis on the binary. It will take 15 to 20 seconds to run, at the end of which it generates an HTML file that lists all of the problems that it has found in your code, complete with line numbers and comment blocks explaining the problem. The first time you run it can be pretty shocking. Here are some example screen-shots from a sample run on an XCode iPhone SDK project. First you’ll see a summary box showing the various types of issues that were found in your code:


As you can see, it’s found a few leaks, and a missing super dealloc method call. If we drill into one of these, we can see some extremely detailed information about the problem:


Notice that your actual code is shown, with the problem area highlighted, and comment boxes added in to describe the issue. It looks like we’ve forgotten to release the ns object here. This makes finding and resolving memory leaks much easier than trying to use Instruments to profile an app in real time. Clang will also catch leaked images, which is a huge benefit. Here’s another example of an issue found by Clang:


As you can see, this method returns an object with a retain count of 1, but the method name doesn’t start with “new”, “copy”, or “alloc”, and thus violates Objective-C naming conventions. This could be fixed by changing the name of the method to “newSomeMethod”, which would likely cause an leak to be flagged in the calling method, or you could autorelease the object on return, and retain it in the caller.

Where to get Clang?

You can download Clang here:

http://clang.llvm.org/StaticAnalysis.html

Using Clang

Clang is run from the command-line, so you’ll have to run it from the Terminal. After installing it, you will also probably want to add Clang to your system path. To do so, in the terminal, create a file named .bash_profile (assuming you’re using the default Bash shell), and add this line:

export PATH=/Developer/Applications/Clang:$PATH

I’ve installed Clang in /Developer/Applications/Clang. You would obviously change this to be your own install location.

To run Clang, you’ll have to restart your terminal session. You then want to build the app in XCode with the Simulator/Debug profile, and navigate to your project directory in the Terminal. Once there, you run these two commands:

rm -rf /tmp/scan-build*
rm -rf build/;scan-build –view xcodebuild

You’ll see a lot of text scroll by pretty rapidly, and when it’s finished, your browser will open up an analysis log on port 8181 (by default). Sometimes the Clang server fails to start. I don’t know why. It seems to happen to me about 25% of the time. If this happens, just repeat the process. It’ll probably work next time.

facebooktwittergoogle_plusredditpinterestlinkedinmail Read More

Posted by on Jan 28, 2009 in Code, Mobile |

iPhone Programming: Adding a Contact to the iPhone Address Book


Adding a contact to the iPhone’s address book isn’t horribly complicated, but it’s not the most straightforward process in the world, either, because the documentation leaves a bit to be desired. There is an Address Book Programming Guide published by Apple, but at 28 pages, it feels a bit bloated when you’re just trying to quickly figure out a simple process like this, and somewhat ironically, the “Creating a New Person” section is less than a page, and doesn’t go into much detail. The XCode documentation is helpful, but it still takes some effort to put all the pieces together, so this is basically just a walk-through of the process of creating a new contact, and adding some common fields to it.

To create a new record, we start out by creating a CFErrorRef variable that will hold any errors that get generated throughout the rest of the process. In my experience, most errors here tend to generate exceptions anyway, but there’s an error parameter, so we may as well use it. Anyway, here’s the line:

        CFErrorRef error = NULL; 

We then create our reference to the iPhone Address Book with a call to ABAddressBookCreate():

        ABAddressBookRef iPhoneAddressBook = ABAddressBookCreate();

And then we create a new person record:

        ABRecordRef newPerson = ABPersonCreate();
At this point, we haven’t saved anything to the address book yet, but we can start adding data to the person record. To do this, we use ABRecordSetValue, but some fields need to be formatted differently from others. For some, like first name and last name, we can just pass in a string:

        ABRecordSetValue(newPerson, kABPersonFirstNameProperty, @”John”, &error);
ABRecordSetValue(newPerson, kABPersonLastNameProperty, @”Doe”, &error);

kABPersonFirstNameProperty and kABPersonLastNameProperty are constants defined by Apple that specify which fields you’re saving. They’re listed in the XCode documentation under Personal Information Properties in the ABPerson Reference document. We can also set some other fields in this manner, such as company and title:

        ABRecordSetValue(newPerson, kABPersonOrganizationProperty, @”Model Metrics”, &error);
ABRecordSetValue(newPerson, kABPersonJobTitleProperty, @”Senior Slacker”, &error);

Where it gets a bit trickier is when we want to set our phone, email, or address properties, because these fields use ABMutableMultiValueRef rather than strings to store the data, and the specific data types of the values vary a bit depending on which one we’re talking about. For phone, we would do something like this:
        ABMutableMultiValueRef multiPhone = ABMultiValueCreateMutable(kABMultiStringPropertyType);
ABMultiValueAddValueAndLabel(multiPhone, @”1-555-555-5555″, kABPersonPhoneMainLabel, NULL);
ABMultiValueAddValueAndLabel(multiPhone, @”1-123-456-7890″, kABPersonPhoneMobileLabel, NULL);
ABMultiValueAddValueAndLabel(multiPhone, @”1-987-654-3210″, kABOtherLabel, NULL);
ABRecordSetValue(newPerson, kABPersonPhoneProperty, multiPhone,nil);
CFRelease(multiPhone);

The first two phone types (kABPersonPhoneMainLabel and kABPersonPhoneMobileLabel) are listed as Phone Number Properties in the ABPerson Reference, along with kABPersonPhoneHomeFAXLabel, kABPersonPhoneWorkFAXLabel, and kABPersonPhonePagerLabel. Despite the fact that the two fax numbers and the pager number seem fairly useless (you can’t send a fax from your phone, and who has a pager anymore?) but there’s nothing listed there for Other, or Work Phone or anything like that. That’s where the Generic Property labels come into play:

      kABWorkLabel;
kABHomeLabel;
kABOtherLabel;

Those will file the phone numbers as Work, Home, and Other, respectively. After adding the values to the ABMutableMultiValueRef, we need to call ABRecordSetValue, only this time instead of passing a string in for the third parameter, we pass in multiPhone. Then be sure to free up the memory with CFRelease.

Adding email addresses to the record is pretty similar to adding phone numbers, where we create an ABMutableMultiValueRef of strings:

        ABMutableMultiValueRef multiEmail = ABMultiValueCreateMutable(kABMultiStringPropertyType);
ABMultiValueAddValueAndLabel(multiEmail, @”johndoe@modelmetrics.com”, kABWorkLabel, NULL);
ABRecordSetValue(newPerson, kABPersonEmailProperty, multiEmail, &error);
CFRelease(multiEmail);

Where it gets a little different is when we go to set the street address values. While we do still use an ABMutableMultiValueRef, we won’t be using kABMultiStringPropertyType. To set the street address, we use kABMultiDictionaryPropertyType instead, so we have to create an NSMutableDictionary, and the method calls end up being a bit different:

        ABMutableMultiValueRef multiAddress = ABMultiValueCreateMutable(kABMultiDictionaryPropertyType);

NSMutableDictionary *addressDictionary = [[NSMutableDictionary alloc] init];

            [addressDictionary setObject:@”750 North Orleans Street, Ste 601″ forKey:(NSString *) kABPersonAddressStreetKey];
[addressDictionary setObject:@”Chicago” forKey:(NSString *)kABPersonAddressCityKey];
[addressDictionary setObject:@”IL” forKey:(NSString *)kABPersonAddressStateKey];
[addressDictionary setObject:@”60654″ forKey:(NSString *)kABPersonAddressZIPKey];

          ABMultiValueAddValueAndLabel(multiAddress, addressDictionary, kABWorkLabel, NULL);
ABRecordSetValue(newPerson, kABPersonAddressProperty, multiAddress,&error);
CFRelease(multiAddress);

kABWorkLabel means that we’re setting this as the contact’s work address. And to add it to the contact record, we call ABRecordSetValue as before, releasing the memory afterward.

The last step is to add the new record to the address book, and save it back to the device:

        ABAddressBookAddRecord(iPhoneAddressBook, newPerson, &error);
ABAddressBookSave(iPhoneAddressBook, &error);

And then we can check for any errors:

        if (error != NULL)
{

                  NSLog(@”Danger Will Robinson! Danger!”);

        }


So that concludes this introduction to creating new records in the address book.

Tom

facebooktwittergoogle_plusredditpinterestlinkedinmail Read More

Posted by on Jan 23, 2009 in Code, Mobile |

Lessons for the Beginning iPhone Developer

Getting started with iPhone development can be an intense process. If you’re not coming from the world of OSX development, you’re probably more familiar with the myriad languages that look more like C++ than Smalltalk, and you have a lot of new syntactical things to learn, with square-brackets in abundance. It can be easy to focus completely on learning the syntax of Objective-C, and forget that the iPhone is a device with more severe limits on resources than computers, and that you will ultimately have to get your app approved by Apple before you can distribute it, so you need to follow their guidelines to the letter.

Following are some lessons indented for developers who are well versed in any number of other programming languages, but who are coming to the iPhone for the first time.

Memory Management

This one is huge, and easy to underestimate. Don’t develop your entire application and then decide to check to see if you have any memory problems. The iPhone has about 128 MB of volatile memory on board, and the virtual memory model does not include swap space. This means that, even though your iPhone has 8GB or 16GB of Flash storage, memory that your application allocates will not be swapped out to the disk to free up system memory. Since over-releasing objects will crash an application in often difficult to understand ways, it can be tempting to never release objects. However, the system monitors memory usage, and shuts down any application that takes up too much memory. This is the cause of a great many application crashes on the iPhone. You can use around 30 MB safely. Get closer to 40 or 50, and the system will very likely shut your app down with an exit status of 101.

Technically speaking, the system monitors total memory usage in order to maintain continuity of critical applications, such as the phone system, the audio system, and other systems that run constantly on the phone. When total memory usage climbs high enough that the functionality of these systems is put in jeopardy, the application currently on top of the stack will be shut down. This does mean that it is possible for one of these background processes to be using too much memory, causing your app to be shut down. Shutting down the phone and restarting usually takes care of these sorts of conditions.

Definitely read and understand the Memory Management Programming Guide for Cocoa, it’s one of the most important documents to read.

Generally, the Memory Management guide can be summed up by saying that you must release any object that you create with alloc, new, or copy, or one that you have specifically retained with retain.

Human Interface Guidelines

Read and understand the Apple Human Interface Guidelines. Apple calls this document “required reading” for a reason. They’re not being allegorical. Failure to follow the guidelines has resulted in many apps being rejected from the app store. You can always resubmit, of course, but resubmitting means you’ll have to wait for your app to be approved again.

Understanding the Review Process

Before you can distribute your app on the App Store, you’ll have to submit the app to Apple for review. This can take anywhere from a few days to…unfortunately…a few months. Most apps will get some sort of response from Apple within a week. These responses fall into three categories:

  1. Approved: Hooray! Your app will appear in the App Store shortly.
  2. Rejected: Unless your app has been deemed inappropriate for the app store, you will be given a list of items to fix. Fix them and resubmit for approval.
  3. Unexpected Additional Time to Review: This is bad. iPhone developer forums are full of stories of apps that have gotten this feedback, and have been stuck in the queue for months to follow. It may be a good idea to resubmit your app at this point and hope for another reviewer. I haven’t found any definitive answers on what the best course of action is when this happens.

Exception Breakpoints

By default, exceptions are not very easy to trace in XCode. This is a pain because it makes it impossible to debug application crashes. Luckily, the solution is pretty simple. Adding a global breakpoint for “obj_exception_throw” and “–[NSException raise]” will cause XCode to break on exceptions, allowing the stack trace to be viewed. Global breakpoints can be added in XCode under Run => Show => Breakpoints.

“malloc_error_break” can be used to obtain information on a malloc error.

Zombies!

Over-releasing objects can cause difficult to track down problems, usually resulting in an EXC_BAD_ACCESS exception. Setting the NSZombieEnabled environment variable will dynamically change the class of deallocated objects to _NSZombie rather than actually freeing the memory. This does mean that memory is never freed, so obviously, this isn’t something to be left on all the time, but it can come in handy when trying to track down over-releases and premature releases. NSZombieEnabled is set by editing the Active Executable, and adding an Environment Variable named “NSZombieEnabled” with a value of “YES”.

GDB Console Commands

Debugging in XCode is frustrating until you realize the power of GDB in the console. Set a breakpoint in your code, and you can learn all sorts of things with these commands:

  • print (unsigned int)[someObject retainCount]
    • display the retain count of an object
  • print (unsigned int)[[someObject size] retain]
    • Show the size of an object. The retain is necessary to keep the object from being released here.
  • po someObject
    • display information about an object. In the case of an NSString, the string will be printed.
  • po [someView subviews]
    • Print an array of subviews of a view. 


facebooktwittergoogle_plusredditpinterestlinkedinmail Read More