Pages Menu
Categories Menu

Posted by on Apr 9, 2013 in Mobile, The Cloud |

Developing Offline Apps with Salesforce Mobile Services

Mobile apps and offline access go hand in hand. If a sales rep has five minutes with a doctor and an iPad in the basement of a hospital, or a service rep needs to complete a mobile inspection report in a remote location, they might not have a strong data signal when they need it most. Worldwide cell coverage improves every year, but when it comes right down to it, if you’re on the move, your signal strength and data bandwidth will vary greatly from place to place. Apps are no longer just “online” or “offline” — there’s a huge gray area in between where your device might technically be online, but the connection just isn’t usable enough for mission critical tasks.

The Salesforce Mobile Services does an excellent job of providing the tools needed to build enterprise mobile apps that allow you to securely transfer and store data on your mobile device for highly performant offline access. This post explores how to use the Salesforce Mobile SDK SmartStore to store encrypted data in a NoSQL-style database on both iOS and Android devices. The code shown throughout is written in Javascript, which would be used for hybrid mobile apps, but all of the same Mobile SDK functionality exists in Objective-c for iOS native apps and Java for Android native apps.

facebooktwittergoogle_plusredditpinterestlinkedinmail Read More

Posted by on Nov 13, 2012 in Code, Mobile, The Cloud |

Windows 8 Development for Force.com – Part 1, OAuth 2.0

Windows 8 SFDC OAuth 2.0

This is the beginning of a multipart series on developing Windows 8 mobile apps for Salesforce.com with the user interface design language that was–until recently–referred to as Metro UI. Though the name is now Windows 8 UI, the typography-based design principles are the same, and you can read more about them in my April 30 blog post.

Over the course of this series, we’ll be developing a simple Chatter client for Windows 8 , shown below. The code for this is on GitHub, so feel free to follow along there. Part 1 covers how to log into Salesforce.com (or Database.com) and maintain a connection using OAuth 2.0, an industry-standard secure authentication mechanism. OAuth is the preferred mechanism for logging into SFDC from mobile or web apps, and if you haven’t seen it used in a business app before, you’ve almost certainly used it to log into a mobile app using your Facebook, Twitter, or LinkedIn credentials. One of the primary benefits of using OAuth in mobile apps is that the actual login dialog is hosted by the service provider, so the user never enters their username or password directly into the application itself. As you can see in the screenshot above, the actual login screen is shown within a webview, and carries the Salesforce.com branding so the user knows what service they’re logging into.

Chatter for Windows 8

Logging into Salesforce.com from a mobile app and maintaining that authentication so that the user doesn’t have to log in every time the session expires requires the implementation of two separate OAuth 2.0 flows. The User-Agent Flow handles the initial login to the app, and the Refresh-Token Flow handles refreshing the session key (the OAuth Access Token) whenever it expires. The expiration timeout value is configurable from within Salesforce setup to between 15 minutes and 12 hours.

Salesforce.com Setup

The first thing you’ll need before you begin on the mobile app is a Consumer Key and a Callback URL (also referred to as a Redirect URI) from your Salesforce org. For information on how to get these from Remote Access configuration, take a look at the Salesforce Configuration section of my OAuth 2.0 for Salesforce.com blog post.

User-Agent Flow

We’ll start out with the User-Agent flow to get an initial login to the app. To start, take a look at SFDCSession.cs in the GitHub repository. This class is a singleton that’s used to maintain session state throughout the app. Any class throughout the app can access the session information with the SFDCSession.Instance static accessor method. You’ll see the AccessToken and RefreshToken are defined as empty strings, and the ConsumerKey and RedirectUri are defined to match the remote access information in my SFDC developer org (you’ll just have to believe me on that one). The User-Agent flow is implemented using the oAuthUserAgentFlow() method in this class.

The first thing I’ve done in oAuthUserAgentFlow() is check to see if we already have an AccessToken. That way if the method gets called twice for some reason, or if a developer wants to hard-code an Access Token to speed up development, it will just skip over the rest of the method, and return the Access Token to the calling function.

Next, we check to see if we have a Refresh Token persisted in the encrypted PasswordVault from a previous run of the application. Since the Refresh Token can be used to generate Access Tokens to Salesforce.com, it’s important to treat it as secure data, and encrypt it accordingly. The RefreshToken getters and setters handle storing and retrieving the refresh token with vault.Retrieve() and vault.Add().

If we are able to retrieve a Refresh Token from the PasswordVault, then we can use the Refresh Token flow (which we’ll cover in a bit) to get a new Access Token.

One thing you’re seeing here that you may not be familiar with if you’re not already a C# programmer is the await keyword. To use await, you need to declare the method as async. This is a simple way to launch an asynchronous operation without blocking the UI thread. Since both the Access Token Flow and the Refresh Token Flow are network operations that call out to Salesforce.com endpoints, it’s necessary to use await in order to keep the application responsive to user interaction while the network operation is happening in the background.

If we don’t have a Refresh Token stored, this is either the first run of the application, or the user has previously logged out of their session, so we need to present the login dialog. Microsoft actually makes this fairly straightforward using WebAuthenticationBroker and some related classes. First, we need to define our request URI. This is the HTTP GET request that we send to Salesforce to request the login dialog be displayed to the user, and it comes in this format:

https://login.salesforce.com/services/oauth2/authorize?
response_type=token&
display=touch&
client_id=[CONSUMER KEY]
redirect_uri=[REDIRECT URI]

Into this, we plug our Consumer Key and WebUtility URLEncoded Redirect URI from our Salesforce.com Remote Access settings (or Connected Apps if you’re using that instead — as of the Winter 2013 release, Connected Apps is in Pilot release). We can then call the AuthenticateAsync method of WebAuthenticationBroker with our Request URI and our Callback URI. This returns an object of type WebAuthenticationResult. First we check to make sure the ResponseStatus is successful, and if it is ResponseData will contain the response URI from Salesforce.com containing our Access Token, Refresh Token, the Instance URL we should use for calls to the Force.com REST API, and some other information like the Org Id and the logged-in User’s Id. We save all of this information, and the RefreshToken setter stores that piece of important information in our PasswordVault. The Instance URL isn’t a secret, but it is useful to keep around, so we save it using the ApplicationData class, which gives us simple key/value storage that can be easily and automatically synchronized between Windows 8 systems.

At this point, we have authenticated, and we have all of the information needed to query the Force.com REST API or the Chatter REST API. We’ll get to how exactly we do that in Part 2 of this series. But first, we need to implement the Refresh Token Flow so that the app can reauthenticate behind the scenes when the Access Token expires.

Refresh Token Flow

Compared to the User-Agent Flow, the Refresh Token flow is pretty simple. It doesn’t require the user to do anything, so it can happen asynchronously behind the scenes whenever the app launches or if the REST API returns an HTTP 401 Unauthorized response to a query. The flow requires an HTTP POST request be sent to login.salesforce.com using these parameters:

Method: POST
URI: https://login.salesforce.com/services/oauth2/token
Parameters: grant_type=refresh_token&client_id=[CONSUMER KEY]&refresh_token=[REFRESH TOKEN]

If successful, the response from Salesforce returns a new Access Token and a new Instance URL. It’s possible — though unlikely — that your Salesforce.com org will have changed from one server instance (na1, na2, etc.) to another since the last login, so it’s a good idea to update both.

Refresh Token Flow

Anyway, that’s it. Be sure to check back for the next part in this series, where we’ll dig into querying the Chatter REST API, and showing the feed in the UI.

facebooktwittergoogle_plusredditpinterestlinkedinmail Read More

Posted by on Oct 17, 2012 in Code, The Cloud |

Big Data Made Small with Heroku, DynamoDB, and Elastic Map Reduce

Word CloudOne million tweets per day.

An average of fifteen words per tweet.

Four (awesome) days of Dreamforce 2012…

Out of the 60 million words that scrolled across the screen on the Model Metrics Art of Code exhibit Moving the Cloud during Dreamforce 2012, which were the most frequently used? Well, “social” was #1, then “touch” and “mobile”. The word cloud above shows the rest of the top 100. But how did we calculate that? And, more importantly, how can we do so in a way that will easily scale up to working with much larger data sets?

Well, Moving the Cloud is written in Node.js, and I didn’t want to do anything that would tax the production version of the page, so the first thing I did was to create a simplified version of it by stripping out the UI/HTTP layer and adding in the Dynamo package for working with Amazon DynamoDB. DynamoDB is a highly performant, highly scaleable NoSQL database service hosted by Amazon Web Services. Amazon automatically handles scaling the storage space for you with super-fast SSD drives. Your main configuration options are to set the max number of allowed reads per second, and the max number of writes per second. Changing these values takes less than a minute, and you can set up CloudWatch alarms to let you know if you’re getting close to the limits. You pay more for higher limits, and we were seeing around 25-50 tweets per second max, so I set the write limit to 100. The read limit only really matters when you want to start reporting on the data, so I set it pretty low initially.

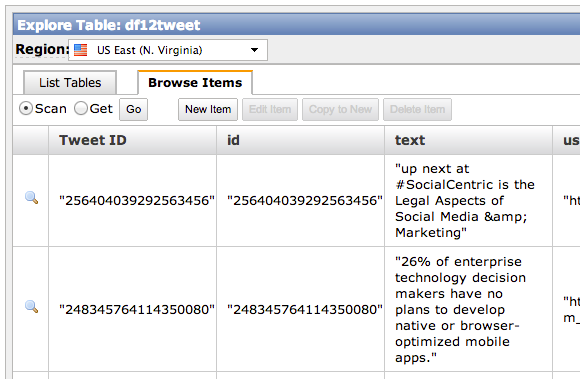
As you can see from the Trendy-Dynamo code in GitHub, the actual communication with DynamoDB from Node.js is pretty simple. DynamoDB stores Key/Value pairs, and has no defined schema aside from requiring a primary key. The Twitter Streaming API returns JSON documents with a lot of extra cruft, so I pulled out the relavent information and stored in in DynamoDB:

DynamoDB Explorer

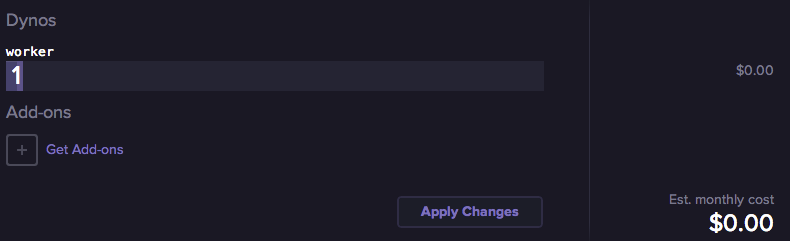
Back in the olden days of aught four, I might have set this running on an old linux box laying around my house (I still actually have a few big towers stacked in the basement, along with boxes of power supplies and old parts, but they haven’t been turned on in ages). Then my ISP would drop the connection, or the power supply would fail, and I’d be missing a bunch of data. Enter Heroku. Such an app can literally be hosted for free on the Heroku Cedar Stack with one Worker Dyno:

Heroku Worker Dyno

Okay, so that’s the initial setup — let’s move ahead a few days — #DF12 is over, and we have 60 million words to count. This is where Elastic Map Reduce (EMR) comes in. EMR is a hosted instance of Apache Hadoop, and Map-Reduce is a handy algorithm for taking huge data sets and breaking them down into smaller, manageable chunks. Think of it like this — imagine in this image that each of the three multi-colored blocks on the left side is one individual tweet…

Map Reduce

Say the red block is the word “salesforce”, the yellow block is the word “is”, and the blue block is the word “social”. The first step of the process is to count the instances of each word in that tweet. Then, we increment the count of that word in every tweet. Simple, right? Over time, we break down 60 million words into a reduced set where each word occurs only once, but is accompanied by a number that represents the total number of occurrences. To do this with EMR, the first thing we need to do is to snapshot the data from DynamoDB into Amazon S3. To do this, I’ve used an interactive command line Hadoop tool named Apache Hive. It allows you to map external tables and to query them with SQL-like syntax.

Using Hive, I created an external table for DynamoDB:

CREATE EXTERNAL table dynamo_tweet (tweet_id string, tweet_text string)
STORED BY 'org.apache.hadoop.hive.dynamodb.DynamoDBStorageHandler'
TBLPROPERTIES ("dynamodb.table.name" = "df12tweet","dynamodb.column.mapping" = "tweet_id:Tweet ID,tweet_text:text");

And an external table for S3:

CREATE EXTERNAL TABLE s3_df12snapshot (tweet_id string, tweet_text string)
ROW FORMAT DELIMITED FIELDS TERMINATED BY ','
LOCATION 's3://mm-trendy-dynamo/demo_output/';

And then copy from one to the other:

INSERT OVERWRITE TABLE s3_df12snapshot
SELECT * FROM dynamo_tweet;

Snapshotting takes a little while, so go get a coffee or something… Don’t worry, I’ll wait.

…And, we’re back. Okay, so now we need to actually run the Map-Reduce job to count each word. Luckily, EMR gives us a sample application that does just that:

WordCount

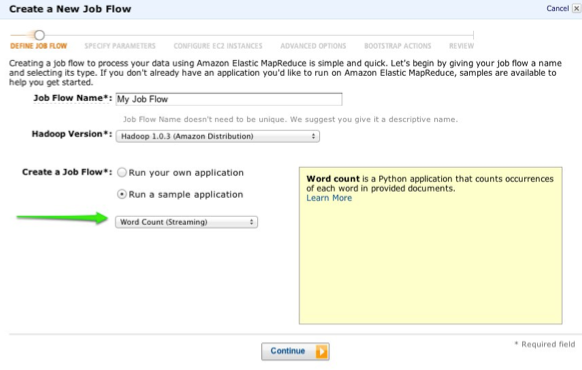
Select the Word Count job, walk through the rest of the wizard, and let it start processing. The amount of time it takes is basically a factor of how many EC2 instances you throw at it, and the processing power of each. When it finishes, the output of the job will be stored in S3, and you can create another external table in Hive:

CREATE EXTERNAL TABLE s3_df12mapreduce (tweet_word string, tweet_count int)
ROW FORMAT DELIMITED FIELDS TERMINATED BY '\t'
LOCATION 's3://mm-trendy-dynamo/outputmapreduce/';

And then query it:

SELECT * FROM s3_df12mapreduce
WHERE LENGTH(tweet_word) > 4
ORDER BY tweet_count DESC
LIMIT 100;

What you do with this map/reduced data is then up to you, but if you’re interested in how I created the word cloud, I used this D3-Cloud Javascript Library

TL;DR: I made a wordcloud with some tweets.

facebooktwittergoogle_plusredditpinterestlinkedinmail Read More